EC-CUBE3でphp7.3以降に対応させる方法
EC-CUBE Advent Calendar 2021 9日目の記事です。
EC-CUBE3では公開当初php5.3〜7.1までしか対応しておらず、最近のレンタルサーバではphp7.3以上しか利用できないというケースが増えています。
また、レンタルサーバによっては事前アナウンスはありますが、強制的にphp7.4に変更されたりする時もあります。
そこで、php7.3以降でも動作する対応方法をご紹介します。
php7.3以降の対応方法
前提条件として最新のEC-CUBE3系で説明しますが、それ以外をお使いの方でも恐らく動作すると思います。
EC-CUBE3系をお使いの方で何も対応せずにphp7.3にすると、selectタグが正常に動作されない現象が発生します。
- php7.2以下

- php7.3以上
こちらを対応するにはTwigのバージョンを1.41.0以上にする必要があります。
導入方法ですがMac及びLinuxを対象に説明しますが、レンタルサーバ上で対応する場合、SSHでログイン出来る環境を前提にしています。
- composer.pharファイルの取得
EC-CUBEが保存されているディレクトリ まで移動し、以下のコマンドを実行します。
curl -OL https://getcomposer.org/download/1.10.23/composer.phar
- Twigのインストール
twigをインストールします。以下のコマンドを実行します。時間がかかるため気長にお待ちください。
php composer.phar require --ignore-platform-reqs twig/twig "1.41.0"
以上でphp7.3以降でも問題なく動作されるようになります。
もし、SSHが利用できないという方は推奨はしていませんが、下記ファイルを書き換えることでも対応可能です。
- vendor/twig/twig/lib/Twig/Lexer.php
174行目にある、
if (isset($this->positions[2][$this->position][0])) {
    $text = rtrim($text);
}
を
if (isset($this->positions[2][$this->position][0]) && ($this->options['whitespace_trim'] === $this->positions[2][$this->position][0])) {
    $text = rtrim($text);
}
に変更してください。 こちらの方法で対応された方は必ず管理画面のキャッシュ管理よりキャッシュ削除をしてください。
以上でphp7.3以降の対応となりますので、お困りの方は是非お試しください。
EC-CUBE3でGA4とUAの簡易的なeコマースタグ設定方法
EC-CUBE Advent Calendar 2021 8日目の記事です。
EC-CUBEでサイトを公開した後に、eコマースタグを設定したいという要望があります。 その方法を簡単に書いてきます。
GA4はまだ利用されていない方も多いと思いますので、 今回はGA4とUA両方対応できるようにタグを記述していますが、 どちらかしか利用していない場合、不要なコードは削除してください。
前提条件として、タグマネージャー を利用していることとします。 eコマースの詳細な解説は以下の公式サイトもご確認ください。
EC-CUBE4用はこちらをご覧ください。
EC-CUBE4でGA4とUAの簡易的なeコマースタグ設定方法 - AmidaikeBlog
タグマネージャーの設置方法
タグマネージャー用ブロック作成
ブロック管理より、以下のブロックを作成しておきます。
- ヘッダー用タグ作成
ブロック名 : Google Tag Manager head
ファイル名 : googletagmanagerhead
コード :
<!-- Google Tag Manager -->
<script>(function(w,d,s,l,i){w[l]=w[l]||[];w[l].push({'gtm.start':
new Date().getTime(),event:'gtm.js'});var f=d.getElementsByTagName(s)[0],
j=d.createElement(s),dl=l!='dataLayer'?'&l='+l:'';j.async=true;j.src=
'https://www.googletagmanager.com/gtm.js?id='+i+dl;f.parentNode.insertBefore(j,f);
})(window,document,'script','dataLayer','GTM-XXXXXXXX');</script>
<!-- End Google Tag Manager -->
- bodyタグ直下用タグ作成
ブロック名 : Google Tag Manager body
ファイル名 : googletagmanagerbody
コード :
<!-- Google Tag Manager (noscript) -->
<noscript><iframe src="https://www.googletagmanager.com/ns.html?id=GTM-XXXXXXXX"
height="0" width="0" style="display:none;visibility:hidden"></iframe></noscript>
<!-- End Google Tag Manager (noscript) -->
XXXXXXXXの箇所はそれぞれのIDに置き換えてください。
ページ管理に設定
作成したそれぞれのブロックをページ管理のTOPページのレイアウト編集で配置します。
配置場所はそれぞれ、以下の場所へ配置します。
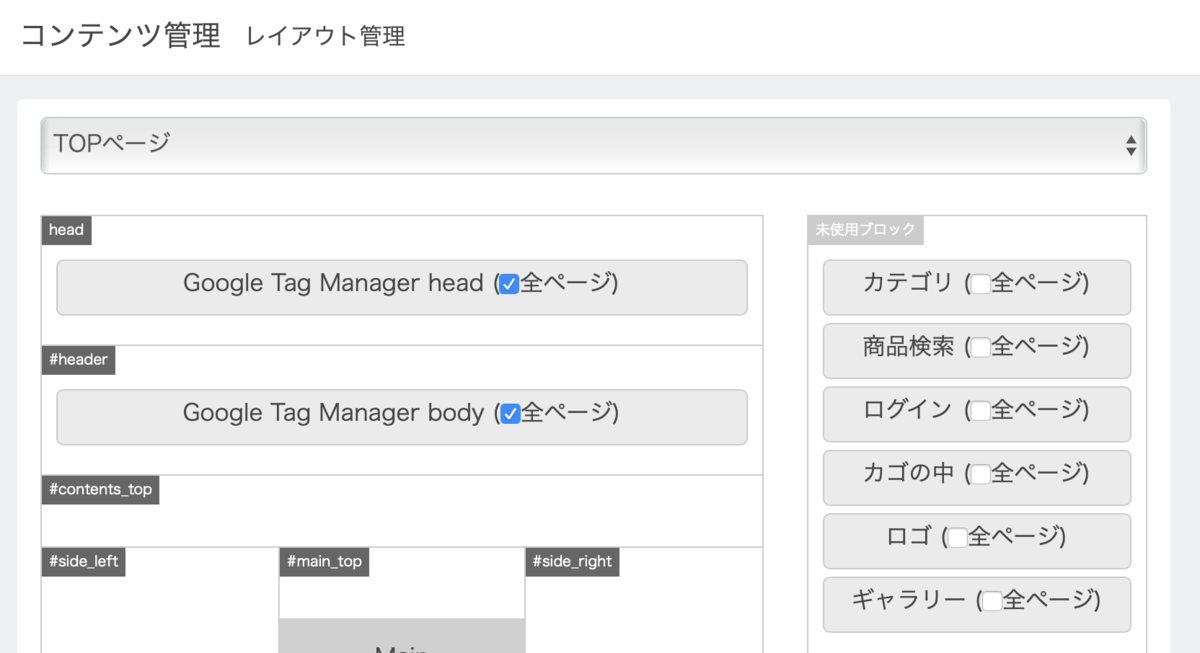
全ページにチェックを入れるのを忘れないでください。
eコマースタグ用ブロックの作成
再度ブロック管理より以下のブロックを作成してください。
- eコマースタグ用ブロック作成
ブロック名 : Google Ecommerce Tag
ファイル名 : ecommerce
コード :
{% if app.request.get('_route') == 'product_list' %}
    {# 商品一覧 #}
    <script>
        dataLayer.push({ecommerce: null});
        // GA4
        dataLayer.push({
            'event': 'view_item_list',
            'ecommerce': {
                'items': [
                    {% for Product in pagination %}
                    {
                        'item_name': '{{ Product.name }}',
                        'item_id': '{{ Product.getCodeMin ? Product.getCodeMin : Product.id }}',
                        'price': '{{ Product.getPrice02IncTaxMin }}',
                    }{% if not loop.last %},{% endif %}
                    {% endfor %}
                ]
            }
        });

        // UA
        dataLayer.push({
            'ecommerce': {
                'currencyCode': 'JPY',
                'impressions': [
                    {% for Product in pagination %}
                    {
                        'name': '{{ Product.name }}',
                        'id': '{{ Product.getCodeMin ? Product.getCodeMin : Product.id }}',
                        'price': '{{ Product.getPrice02IncTaxMin }}',
                    }{% if not loop.last %},{% endif %}
                    {% endfor %}
                ]
            }
        });
    </script>

{% elseif app.request.get('_route') == 'product_detail' %}
    {# 商品詳細 #}
    <script>
        dataLayer.push({ecommerce: null});
        // GA4
        dataLayer.push({
            'event': 'view_item',
            'ecommerce': {
                'items': [{
                    'item_name': '{{ Product.name }}',
                    'item_id': '{{ Product.getCodeMin ? Product.getCodeMin : Product.id }}',
                    'price': '{{ Product.getPrice02IncTaxMin }}',
                    'item_category': '{% for ProductCategory in Product.ProductCategories %}{% for Category in ProductCategory.Category.path %}{% if ( Category.parent is not null ) %}{{ Category.Parent.name }}:{{ Category.name }}{% endif %}{% endfor %}{% endfor %}',
                    'quantity': '1'
                }]
            }
        });

        // UA
        dataLayer.push({
            'ecommerce': {
                'detail': {
                    'products': [{
                        'name': '{{ Product.name }}',
                        'id': '{{ Product.getCodeMin ? Product.getCodeMin : Product.id }}',
                        'price': '{{ Product.getPrice02IncTaxMin }}',
                        'category': '{% for ProductCategory in Product.ProductCategories %}{% for Category in ProductCategory.Category.path %}{% if ( Category.parent is not null ) %}{{ Category.Parent.name }}:{{ Category.name }}{% endif %}{% endfor %}{% endfor %}',
                    }]
                }
            }
        });
    </script>

{% elseif app.request.get('_route') == 'cart' %}
    {# カートに追加 #}
    <script>
        dataLayer.push({ecommerce: null});
        // GA4
        dataLayer.push({
            'event': 'add_to_cart',
            'ecommerce': {
                'items': [
                    {% for CartItem in Cart.CartItems %}
                    {% set ProductClass = CartItem.Object %}
                    {% set Product = ProductClass.Product %}
                    {
                        'item_name': '{{ Product.name }}',
                        'item_id': '{{ Product.getCodeMin ? Product.getCodeMin : Product.id }}',
                        'price': '{{ Product.getPrice02IncTaxMin }}'
                    }{% if not loop.last %},{% endif %}
                    {% endfor %}
                ]
            }
        });

        // UA
        dataLayer.push({
            'event': 'addToCart',
            'ecommerce': {
                'currencyCode': 'JPY',
                'add': {
                    'products': [
                        {% for CartItem in Cart.CartItems %}
                        {% set ProductClass = CartItem.Object %}
                        {% set Product = ProductClass.Product %}
                        {
                            'name': '{{ Product.name }}',
                            'id': '{{ Product.getCodeMin ? Product.getCodeMin : Product.id }}',
                            'price': '{{ Product.getPrice02IncTaxMin }}',
                            'quantity': {{ CartItem.quantity }}
                        }{% if not loop.last %},{% endif %}
                        {% endfor %}
                    ]
                }
            }
        });
    </script>

{% elseif app.request.get('_route') == 'shopping_complete' %}
    {# 購入完了 #}

    {% if Order.id %}
        <script>
            dataLayer.push({ecommerce: null});
            // GA4
            dataLayer.push({
                'event': 'purchase',
                'ecommerce': {
                    'transaction_id': '{{ Order.id }}',
                    'affiliation': '{{ BaseInfo.shop_name }}',
                    'value': '{{ Order.subtotal }}',
                    'tax': '{{ Order.tax }}',
                    'shipping': '{{ Order.delivery_fee_total }}',
                    'currency': 'JPY',
                    'items': [
                        {% for OrderDetail in Order.OrderDetails %}
                        {
                            'item_name': '{{ OrderDetail.product_name }}',
                            'item_id': '{{ OrderDetail.product_code ? OrderDetail.product_code : OrderDetail.product.id }}',
                            'price': '{{ OrderDetail.price_inc_tax }}',
                            'item_category': '{% for ProductCategory in OrderDetail.Product.ProductCategories %}{% for Category in ProductCategory.Category.path %}{% if ( Category.parent is not null ) %}{{ Category.Parent.name }}:{{ Category.name }}{% endif %}{% endfor %}{% endfor %}',
                            'quantity': {{ OrderDetail.quantity }}
                        }{% if not loop.last %},{% endif %}
                        {% endfor %}
                    ]
                }
            });

            // UA
            dataLayer.push({
                'ecommerce': {
                    'purchase': {
                        'actionField': {
                            'id': '{{ Order.id }}',
                            'affiliation': '{{ BaseInfo.shop_name }}',
                            'revenue': '{{ Order.subtotal }}',
                            'tax': '{{ Order.tax }}',
                            'shipping': '{{ Order.delivery_fee_total }}'
                        },
                        'products': [
                            {% for OrderDetail in Order.OrderDetails %}
                            {
                                'name': '{{ OrderDetail.product_name }}',
                                'id': '{{ OrderDetail.product_code ? OrderDetail.product_code : OrderDetail.product.id }}',
                                'price': '{{ OrderDetail.price_inc_tax }}',
                                'category': '{% for ProductCategory in OrderDetail.Product.ProductCategories %}{% for Category in ProductCategory.Category.path %}{% if ( Category.parent is not null ) %}{{ Category.Parent.name }}:{{ Category.name }}{% endif %}{% endfor %}{% endfor %}',
                                'quantity': {{ OrderDetail.quantity }}
                            }{% if not loop.last %},{% endif %}
                            {% endfor %}
                        ]
                    }
                }
            });
        </script>
    {% endif %}

{% endif %}
こちらの内容ですが、route名で判断して必要なeコマースタグ用のコードを設定しています。 また、項目についても必要最低限の記述しかしていないため、適宜追加してみてください。
ページ管理に設定
作成したそれぞれのブロックを再度ページ管理のTOPページのレイアウト編集で配置します。
配置場所は以下の場所へ配置します。

今回は基本的なアクションしか設定していませんが、「ショッピング カートから商品を削除する」などのアクションについても似たような方法で記述すれば対応可能です。
なお、GA4の場合、タグマネージャーの設定が複雑なためこちらは時間がある時にまたまとめます。
以上でeコマースタグの設置方法となりますので参考にしてください。
EC-CUBE4でGA4とUAの簡易的なeコマースタグ設定方法
EC-CUBE Advent Calendar 2021 4日目の記事です。
EC-CUBEでサイトを公開した後に、eコマースタグを設定したいという要望があります。 その方法を簡単に書いてきます。
GA4はまだ利用されていない方も多いと思いますので、 今回はGA4とUA両方対応できるようにタグを記述していますが、 どちらかしか利用していない場合、不要なコードは削除してください。
前提条件として、タグマネージャー を利用していることとします。 eコマースの詳細な解説は以下の公式サイトもご確認ください。
タグマネージャーの設置方法
タグマネージャー用ブロック作成
ブロック管理より、以下のブロックを作成しておきます。
- ヘッダー用タグ作成
ブロック名 : Google Tag Manager head
ファイル名 : googletagmanagerhead
コード :
<!-- Google Tag Manager -->
<script>(function(w,d,s,l,i){w[l]=w[l]||[];w[l].push({'gtm.start':
new Date().getTime(),event:'gtm.js'});var f=d.getElementsByTagName(s)[0],
j=d.createElement(s),dl=l!='dataLayer'?'&l='+l:'';j.async=true;j.src=
'https://www.googletagmanager.com/gtm.js?id='+i+dl;f.parentNode.insertBefore(j,f);
})(window,document,'script','dataLayer','GTM-XXXXXXXX');</script>
<!-- End Google Tag Manager -->
- bodyタグ直下用タグ作成
ブロック名 : Google Tag Manager body
ファイル名 : googletagmanagerbody
コード :
<!-- Google Tag Manager (noscript) -->
<noscript><iframe src="https://www.googletagmanager.com/ns.html?id=GTM-XXXXXXXX"
height="0" width="0" style="display:none;visibility:hidden"></iframe></noscript>
<!-- End Google Tag Manager (noscript) -->
XXXXXXXXの箇所はそれぞれのIDに置き換えてください。
レイアウト管理に設定
作成したそれぞれのブロックをトップページ用レイアウトと下層ページ用レイアウトに配置します。
配置場所はそれぞれ、以下の場所へ配置します。
トップページ用レイアウト

下層ページ用レイアウト

eコマースタグ用ブロックの作成
再度ブロック管理より以下のブロックを作成してください。
- eコマースタグ用ブロック作成
ブロック名 : Google Ecommerce Tag
ファイル名 : ecommerce
コード :
{% if app.request.get('_route') == 'product_list' %}
    {# 商品一覧 #}
    <script>
        dataLayer.push({ecommerce: null});
        // GA4
        dataLayer.push({
            'event': 'view_item_list',
            'ecommerce': {
                'items': [
                    {% for Product in pagination %}
                    {
                        'item_name': '{{ Product.name }}',
                        'item_id': '{{ Product.getCodeMin ? Product.getCodeMin : Product.id }}',
                        'price': '{{ Product.getPrice02IncTaxMin }}',
                        'item_category': '{% for ProductCategory in Product.ProductCategories %}{% for Category in ProductCategory.Category.path %}{% if ( Category.parent is not null ) %}{{ Category.Parent.name }}:{{ Category.name }}{% endif %}{% endfor %}{% endfor %}',
                    }{% if not loop.last %},{% endif %}
                    {% endfor %}
                ]
            }
        });

        // UA
        dataLayer.push({
            'ecommerce': {
                'currencyCode': 'JPY',
                'impressions': [
                    {% for Product in pagination %}
                    {
                        'name': '{{ Product.name }}',
                        'id': '{{ Product.getCodeMin ? Product.getCodeMin : Product.id }}',
                        'price': '{{ Product.getPrice02IncTaxMin }}',
                        'category': '{% for ProductCategory in Product.ProductCategories %}{% for Category in ProductCategory.Category.path %}{% if ( Category.parent is not null ) %}{{ Category.Parent.name }}:{{ Category.name }}{% endif %}{% endfor %}{% endfor %}',
                    }{% if not loop.last %},{% endif %}
                    {% endfor %}
                ]
            }
        });

    </script>

{% elseif app.request.get('_route') == 'product_detail' %}
    {# 商品詳細 #}
    <script>
        // Measure a view of product details. This example assumes the detail view occurs on pageload,
        dataLayer.push({ecommerce: null});  // Clear the previous ecommerce object.
        // GA4
        dataLayer.push({
            'event': 'view_item',
            'ecommerce': {
                'items': [{
                    'item_name': '{{ Product.name }}',
                    'item_id': '{{ Product.getCodeMin ? Product.getCodeMin : Product.id }}',
                    'price': '{{ Product.getPrice02IncTaxMin }}',
                    'item_category': '{% for ProductCategory in Product.ProductCategories %}{% for Category in ProductCategory.Category.path %}{% if ( Category.parent is not null ) %}{{ Category.Parent.name }}:{{ Category.name }}{% endif %}{% endfor %}{% endfor %}',
                    'quantity': '1'
                }]
            }
        });

        // UA
        dataLayer.push({
            'ecommerce': {
                'detail': {
                    'products': [{
                        'name': '{{ Product.name }}',         // Name or ID is required.
                        'id': '{{ Product.getCodeMin ? Product.getCodeMin : Product.id }}',
                        'price': '{{ Product.getPrice02IncTaxMin }}',
                        'category': '{% for ProductCategory in Product.ProductCategories %}{% for Category in ProductCategory.Category.path %}{% if ( Category.parent is not null ) %}{{ Category.Parent.name }}:{{ Category.name }}{% endif %}{% endfor %}{% endfor %}',
                    }]
                }
            }
        });
    </script>

{% elseif app.request.get('_route') == 'cart' %}
    {# カートに追加 #}
    <script>
        // Measure when a product is added to a shopping cart
        dataLayer.push({ecommerce: null});  // Clear the previous ecommerce object.
        // GA4
        dataLayer.push({
            'event': 'add_to_cart',
            'ecommerce': {
                'items': [
                    {% for CartIndex,Cart in Carts %}
                    {% for CartItem in Cart.CartItems %}
                    {% set ProductClass = CartItem.ProductClass %}
                    {% set Product = ProductClass.Product %}
                    {
                        'item_name': '{{ Product.name }}',
                        'item_id': '{{ Product.getCodeMin ? Product.getCodeMin : Product.id }}',
                        'price': '{{ Product.getPrice02IncTaxMin }}'
                    }{% if not loop.last %},{% endif %}
                    {% endfor %}
                    {% endfor %}
                ]
            }
        });

        // UA
        dataLayer.push({
            'event': 'addToCart',
            'ecommerce': {
                'currencyCode': 'JPY',
                'add': {
                    'products': [
                        {% for CartIndex,Cart in Carts %}
                        {% for CartItem in Cart.CartItems %}
                        {% set ProductClass = CartItem.ProductClass %}
                        {% set Product = ProductClass.Product %}
                        {
                            'name': '{{ Product.name }}',
                            'id': '{{ Product.getCodeMin ? Product.getCodeMin : Product.id }}',
                            'price': '{{ Product.getPrice02IncTaxMin }}',
                            'quantity': {{ CartItem.quantity }}
                        }{% if not loop.last %},{% endif %}
                        {% endfor %}
                        {% endfor %}
                    ]
                }
            }
        });

    </script>

{% elseif app.request.get('_route') == 'shopping_complete' %}
    {# 購入完了 #}

    {% if Order.id %}
        <script>
            dataLayer.push({ecommerce: null});
            // GA4
            dataLayer.push({
                'event': 'purchase',
                'ecommerce': {
                    'transaction_id': '{{ Order.order_no }}',
                    'affiliation': '{{ BaseInfo.shop_name }}',
                    'value': '{{ Order.subtotal }}',
                    'tax': '{{ Order.tax }}',
                    'shipping': '{{ Order.delivery_fee_total }}',
                    'currency': 'JPY',
                    'items': [
                        {% for OrderItem in Order.MergedProductOrderItems %}
                        {
                            'item_name': '{{ OrderItem.product_name }}',
                            'item_id': '{{ OrderItem.product_code ? OrderItem.product_code : OrderItem.product.id }}',
                            'price': '{{ OrderItem.price_inc_tax }}',
                            'item_category': '{% for ProductCategory in OrderItem.Product.ProductCategories %}{% for Category in ProductCategory.Category.path %}{% if ( Category.parent is not null ) %}{{ Category.Parent.name }}:{{ Category.name }}{% endif %}{% endfor %}{% endfor %}',
                            'quantity': {{ OrderItem.quantity }}
                        }{% if not loop.last %},{% endif %}
                        {% endfor %}
                    ]
                }
            });

            // UA
            dataLayer.push({
                'ecommerce': {
                    'purchase': {
                        'actionField': {
                            'id': '{{ Order.order_no }}',
                            'affiliation': '{{ BaseInfo.shop_name }}',
                            'revenue': '{{ Order.subtotal }}',
                            'tax': '{{ Order.tax }}',
                            'shipping': '{{ Order.delivery_fee_total }}'
                        },
                        'products': [
                            {% for OrderItem in Order.MergedProductOrderItems %}
                            {
                                'name': '{{ OrderItem.product_name }}',
                                'id': '{{ OrderItem.product_code ? OrderItem.product_code : OrderItem.product.id }}',
                                'price': '{{ OrderItem.price_inc_tax }}',
                                'category': '{% for ProductCategory in OrderItem.Product.ProductCategories %}{% for Category in ProductCategory.Category.path %}{% if ( Category.parent is not null ) %}{{ Category.Parent.name }}:{{ Category.name }}{% endif %}{% endfor %}{% endfor %}',
                                'quantity': {{ OrderItem.quantity }}
                            }{% if not loop.last %},{% endif %}
                            {% endfor %}
                        ]
                    }
                }
            });
        </script>
    {% endif %}

{% endif %}
こちらの内容ですが、route名で判断して必要なeコマースタグ用のコードを設定しています。 また、項目についても必要最低限の記述しかしていないため、適宜追加してみてください。
レイアウト管理に設定
作成したそれぞれのブロックをトップページ用レイアウトと下層ページ用レイアウトに配置します。
配置場所はそれぞれ、以下の場所へ配置します。
トップページ用レイアウト

下層ページ用レイアウト

今回は基本的なアクションしか設定していませんが、「ショッピング カートから商品を削除する」などのアクションについても似たような方法で記述すれば対応可能です。
なお、GA4の場合、タグマネージャーの設定が複雑なためこちらは時間がある時にまたまとめます。
以上でeコマースタグの設置方法となりますので参考にしてください。
EC-CUBE4でDBへの時間をUTCで保存させないようにする方法
EC-CUBE4から国際化対応が行われており、DBの時間の持たせ方もUTCに対応されています。
データ型の変更 by chihiro-adachi · Pull Request #2185 · EC-CUBE/ec-cube · GitHub
海外なども見据えたサイトであればこのままで問題ありませんが、日本国内のみを対象としており、別システム連携があって直接DBを参照する場合、UTCだと何かと不便な時があるため、UTCで保存させない方法を説明します。
修正方法は非常に簡単で、
- app/config/eccube/packages/doctrine.yaml
        types:
             datetime: 'Eccube\Doctrine\DBAL\Types\UTCDateTimeType'
             datetimetz: 'Eccube\Doctrine\DBAL\Types\UTCDateTimeTzType'
と表記されている箇所を、
#        types:
#            datetime: 'Eccube\Doctrine\DBAL\Types\UTCDateTimeType'
#            datetimetz: 'Eccube\Doctrine\DBAL\Types\UTCDateTimeTzType'
とコメントアウトするだけです。
これを行うことでDBに保存される時間はUTCでは無くなります。
既に本番運用されている方でも、この修正を加えてもDBの時刻がUTCで保存されなくなるだけなので、状況に応じて変更してください。
EC-CUBE4でトップページ等以外はログインを必須にする簡易的な会員制サイトを作る方法
EC-CUBE Advent Calendar 2020 22日目の記事です。
お客さんの要望で会員制のクローズドサイトを作成したいという要望が時々あります。
クローズドサイトといっても完全にクローズドにするのか、トップページと会員登録だけ公開しておくのか、専用IDを別途発行して対応するのかなど色々とあります。
今回は、トップページと会員登録だけを公開した会員制サイトのカスタマイズを紹介します。
ログインが必要となる処理の設定
ログインを必須とするのは、EccubeExtensionクラスに定義を追加するだけで対応可能です。EccubeExtensionクラスは同名のものがあるのでパスを確認するようにしてください。
- src/Eccube/DependencyInjection/EccubeExtension.php
// SSL強制時は, httpsのみにアクセス制限する
$accessControl = [
  ['path' => '^/%eccube_admin_route%/login', 'roles' => 'IS_AUTHENTICATED_ANONYMOUSLY'],
  ['path' => '^/%eccube_admin_route%/', 'roles' => 'ROLE_ADMIN'],
  ['path' => '^/mypage/login', 'roles' => 'IS_AUTHENTICATED_ANONYMOUSLY'],
  ['path' => '^/mypage/withdraw_complete', 'roles' => 'IS_AUTHENTICATED_ANONYMOUSLY'],
  ['path' => '^/mypage/change', 'roles' => 'IS_AUTHENTICATED_FULLY'],
  ['path' => '^/mypage/', 'roles' => 'ROLE_USER'],
];
ここの定義にログイン必須にするための処理を追加します。
// SSL強制時は, httpsのみにアクセス制限する
$accessControl = [
  ['path' => '^/%eccube_admin_route%/login', 'roles' => 'IS_AUTHENTICATED_ANONYMOUSLY'],
  ['path' => '^/%eccube_admin_route%/', 'roles' => 'ROLE_ADMIN'],
  ['path' => '^/mypage/login', 'roles' => 'IS_AUTHENTICATED_ANONYMOUSLY'],
  ['path' => '^/mypage/withdraw_complete', 'roles' => 'IS_AUTHENTICATED_ANONYMOUSLY'],
  ['path' => '^/mypage/change', 'roles' => 'IS_AUTHENTICATED_FULLY'],
  ['path' => '^/mypage/', 'roles' => 'ROLE_USER'],
  // 定義追加
  ['path' => '^/$', 'roles' => 'IS_AUTHENTICATED_ANONYMOUSLY'], // トップページはログイン不要
  ['path' => '^/entry', 'roles' => 'IS_AUTHENTICATED_ANONYMOUSLY'], // 会員登録ページはログイン不要
  ['path' => '^/', 'roles' => 'ROLE_USER'], // 全ページログイン必須
];
この処理を追加後、トップページと会員登録ページ以外にアクセスしてログイン画面が表示されれば設定完了です。
特定商取引やプライバシーポリシーなども除外する場合、上記に定義を追加するだけです。
パスの部分はURLを設定する様にしてください。
権限について
EC-CUBEではログインを行うのに権限が存在しており、
- IS_AUTHENTICATED_ANONYMOUSLY : ログインなしでのアクセス可
- IS_AUTHENTICATED_FULLY : 会員ログインが必要
- ROLE_USER : 会員ログインが必要
- ROLE_ADMIN : 管理者ログインが必要
というようになっています。先ほど設定したIS_AUTHENTICATED_ANONYMOUSLYなどは権限のことを表しています。
ROLE_USERとIS_AUTHENTICATED_FULLYの違いですが、ログイン時に自動ログイン(REMEMBERME)にチェックをいれてログインしている時に動作が異なります。
- ROLE_USER : 自動ログイン済の場合はログイン不要
- IS_AUTHENTICATED_FULLY : 自動ログインされていてもログインが必要
という動作になります。EC-CUBEでは会員情報変更時のこの権限を利用しています。
以上で簡単に会員サイトを作る仕組みを用意しましたが、このままであれば会員登録されると誰でも見れるサイトになってしまいますので、会員登録された場合、管理画面側で本登録をさせるというカスタマイズを行えばよりクローズドなサイトが出来上がります。
その方法は後日説明します。
EC-CUBE4でCSVファイル出力時に数値項目へ'.00'を付与させない方法
EC-CUBE Advent Calendar 2020 20日目の記事です。
EC-CUBE4で注文CSVダウンロードした時に数値項目(金額など)に.00が付与されてダウンロードされます。
国際化対応されているので小数点以下が付与されても別に気にしなくても良いのですが、偶に外部連携時に不要なことがあります。
今回は付与しない方法の説明です。
CsvExportServiceの変更
今回は一部の箇所を変更するのみです。
- src/Eccube/Service/CsvExportService.php
/**
 * CSV出力項目と比較し, 合致するデータを返す.
 *
 * @param \Eccube\Entity\Csv $Csv
 * @param $entity
 *
 * @return string|null
 */
public function getData(Csv $Csv, $entity)
{
    // エンティティ名が一致するかどうかチェック.
    $csvEntityName = str_replace('\\\\', '\\', $Csv->getEntityName());
    $entityName = ClassUtils::getClass($entity);
    if ($csvEntityName !== $entityName) {
        return null;
    }

    // カラム名がエンティティに存在するかどうかをチェック.
    if (!$entity->offsetExists($Csv->getFieldName())) {
        return null;
    }

    // データを取得.
    $data = $entity->offsetGet($Csv->getFieldName());

    // one to one の場合は, dtb_csv.reference_field_name, 合致する結果を取得する.
    if ($data instanceof \Eccube\Entity\AbstractEntity) {
        if (EntityUtil::isNotEmpty($data)) {
            return $data->offsetGet($Csv->getReferenceFieldName());
        }
    } elseif ($data instanceof \Doctrine\Common\Collections\Collection) {
        // one to manyの場合は, カンマ区切りに変換する.
        $array = [];
        foreach ($data as $elem) {
            if (EntityUtil::isNotEmpty($elem)) {
                $array[] = $elem->offsetGet($Csv->getReferenceFieldName());
            }
        }

        return implode($this->eccubeConfig['eccube_csv_export_multidata_separator'], $array);
    } elseif ($data instanceof \DateTime) {
        // datetimeの場合は文字列に変換する.
        return $data->format($this->eccubeConfig['eccube_csv_export_date_format']);
    } else {
        // スカラ値の場合はそのまま.
        return $data;
    }

    return null;
}
となっています、がそれを
/**
 * CSV出力項目と比較し, 合致するデータを返す.
 *
 * @param \Eccube\Entity\Csv $Csv
 * @param $entity
 *
 * @return string|null
 */
public function getData(Csv $Csv, $entity)
{
    // エンティティ名が一致するかどうかチェック.
    $csvEntityName = str_replace('\\\\', '\\', $Csv->getEntityName());
    $entityName = ClassUtils::getClass($entity);
    if ($csvEntityName !== $entityName) {
        return null;
    }

    // カラム名がエンティティに存在するかどうかをチェック.
    if (!$entity->offsetExists($Csv->getFieldName())) {
        return null;
    }

    // データを取得.
    $data = $entity->offsetGet($Csv->getFieldName());

    // one to one の場合は, dtb_csv.reference_field_name, 合致する結果を取得する.
    if ($data instanceof \Eccube\Entity\AbstractEntity) {
        if (EntityUtil::isNotEmpty($data)) {
            return $data->offsetGet($Csv->getReferenceFieldName());
        }
    } elseif ($data instanceof \Doctrine\Common\Collections\Collection) {
        // one to manyの場合は, カンマ区切りに変換する.
        $array = [];
        foreach ($data as $elem) {
            if (EntityUtil::isNotEmpty($elem)) {
                $array[] = $elem->offsetGet($Csv->getReferenceFieldName());
            }
        }

        return implode($this->eccubeConfig['eccube_csv_export_multidata_separator'], $array);
    } elseif ($data instanceof \DateTime) {
        // datetimeの場合は文字列に変換する.
        return $data->format($this->eccubeConfig['eccube_csv_export_date_format']);
    } else {
        // スカラ値の場合はそのまま.
        if (is_string($data)) {
            $data = preg_replace('/\.0+$/', '', $data);
        }
        return $data;
    }

    return null;
}
に変更するだけで対応可能です。
変更箇所は
// スカラ値の場合はそのまま.
if (is_string($data)) {
    $data = preg_replace('/\.0+$/', '', $data);
}
になります。
特に対応する箇所でもないのですが、必要な方はこの記述を追加してください。
EC-CUBE4でポイント履歴を作成する方法
EC-CUBE Advent Calendar 2020 19日目の記事です。
EC-CUBE4ではEC-CUBE3系で無くなったポイント機能が標準で搭載されています。
このポイント機能ですが、ポイント利用とポイント付与しかなくポイント履歴機能は存在しません。
時々お客さんによってはポイント履歴が欲しいと言われることがありますので、今回はポイント履歴を作成します。
今回の変更は複雑な箇所も多いため慣れていない方はお気をつけください。
会員登録時と商品レビュー公開時にも自動ポイント付与及びポイント履歴として表示させるようにカスタマイズも可能ですが今回は省きます。
続きを読む