EC-CUBE4 Web APIの項目追加方法
EC-CUBE Advent Calendar 2021 13日目の記事です。
EC-CUBE4では外部システムと連携する時にお手軽な方法としてEC-CUBE Web APIというプラグインが存在しています。
EC-CUBE4 Web API プラグインの使い方はこちらを参考にしてください。
EC-CUBEをカスタマイズして利用している方は、DBに項目を追加するカスタマイズも行っていると思いますが、API連携時に追加した項目を渡したい時はどうすれば良いかの説明をします。
方法はそのものズバリの説明が開発ドキュメントにあり、app/Plugin/Api/Resource/config/services.yamlに対して追加したEntityへ記述すれば可能です。
取得可能なデータの追加 - EC-CUBE4 Web API プラグイン
上記の方法でも良いのですが、プラグインに対して修正を行いたくない方は、下記の方法でも対応可能です。
まず、app/Customize/Resource/config配下にservices.yamlファイルを作成します。
ファイルを作成後以下のように内容を記述します。
- app/Customize/Resource/config/services.yaml
services:
    custom.api.allow_list:
        class: ArrayObject
        tags: ['eccube.api.allow_list']
        arguments:
            - #
                Eccube\Entity\Order: ['sample1']
                Eccube\Entity\OrderItem: ['aaaaa', 'bbbb']
追加したい項目名を記述することで連携が可能となります。
custom.api.allow_list:と記述している箇所のcustomは何でも構いません。それ以外は変更する必要はありません。
開発ドキュメントには、
プラグインに許可リストが含まれない場合は、 Customize ディレクトリ以下の services.yaml でも定義できます。
と一文だけ記述されており、どのようにすれば良いのか説明が無かったので参考にしてください。
EC-CUBE4で簡易的に領収書や請求書をマイページに表示させる方法
EC-CUBE Advent Calendar 2021 12日目の記事です。
EC-CUBE4では管理画面から納品書を出力する機能はありますが、領収書や請求書を出力する機能がありません。 納品書の機能で件名を変更すれば対応をしようと思えば可能ですが、購入した方のマイページにも領収書や請求書を出力できるようにしたいという要望があります。
今回はその方法を説明します。
領収書・請求書のフォーマット作成
管理画面では納品書はPDFで出力されますが、今回は領収書と請求書はHTMLとしてブラウザに出力後、ブラウザの機能を利用して印刷させる方法とします。Amazonでお馴染みの方法となります。
領収書と納品書のフォーマットですが、twigとして作成する必要があります。以下にサンプルとして載せておきますので自由に改変してください。
それぞれのファイルの配置場所もapp/template/default/Mypage直下となります。
- app/template/default/Mypage/print_receipt.twig (領収書フォーマット)
<!doctype html>
<html lang="ja">
<head>
    <meta charset="UTF-8">
    <link href="https://cdn.jsdelivr.net/npm/bootstrap@5.1.3/dist/css/bootstrap.min.css" rel="stylesheet" integrity="sha384-1BmE4kWBq78iYhFldvKuhfTAU6auU8tT94WrHftjDbrCEXSU1oBoqyl2QvZ6jIW3" crossorigin="anonymous">
    <title>領収書 | {{ BaseInfo.shop_name }}</title>
    <style>
        .container {
            width: 900px !important;
            font-size: 12px;
            margin-top: 20px;
        }

        .logo {
            float: left;
            font-size: 20px;
            font-weight: bold;
        }

        .inshi {
            border: 2px solid #ddd;
            padding: 10px;
            text-align: center;
            margin-right: 5%;
        }

    </style>
    <style media="print">
        #print-footer {
            display: none;
        }

        input[type="text"] {
            outline: 0;
            border: none;
        }

        button,
        #edit,
        #mod {
            display: none;
        }
    </style>
    <script src="https://code.jquery.com/jquery-3.6.0.min.js" integrity="sha256-/xUj+3OJU5yExlq6GSYGSHk7tPXikynS7ogEvDej/m4=" crossorigin="anonymous"></script>
    <script src="{{ asset('assets/js/vendor/printThis.js') }}"></script>
    <script>
        $(function() {

            $('#print').click(function() {
                $('body').printThis({
                    importStyle: true
                });
            });

            $('#edit').click(function() {
                var name = $('.print_name').text();
                var input = $('<input type="text" id="input-name">').val(name);
                $('.print_name').empty().append(input);
                $('#edit').hide();
                $('#mod').show();
            });

            $('#mod').click(function() {
                var newname = $('#input-name').val();
                $('.print_name').empty().text(newname);
                $('#input-name').remove();
                $('#edit').show();
                $('#edit').removeAttr('style');
                $('#mod').hide();
                showEx();
            });

            function showEx() {
                var tmp = $('.print_name').text();

                if (tmp == '') {
                    $('.print_name_ex').hide();
                } else {
                    $('.print_name_ex').show();
                }
            }

        })
    </script>
</head>
<body>
<div class="container">
    <div class="logo">
        {{ BaseInfo.shop_name }}
    </div>
    <div class="text-end">No. {{ Order.order_no }}</div>
    <div class="text-end">注文日 : {{ Order.order_date|date_format(null, 'Y年m月d日') }}</div>
    <h1 class="text-center">領収書</h1>
    <div class="row">
        <div class="col-7">
            <h2 id="name"><span class="print_name">{% if Order.company_name %}{{ Order.company_name }} 御中{% else %}{{ Order.name01 }} {{ Order.name02 }} </span><span class="print_name_ex"> 様</span>{% endif %}</h2>
            <button type="button" id="edit">名称変更</button>
            <button type="button" id="mod" style="display: none;">適用</button>
        </div>
    </div>
    <hr>

    <table class="table text-center">
        <tbody>
        <tr>
            <td class="h3">{{ Order.payment_total|price }} (税込)</td>
        </tr>
        <tr>
            <td>商品購入代として、上記正に領収いたしました。</td>
        </tr>
        <tr>
            <td>{{ Order.payment_method }}</td>
        </tr>
        </tbody>
    </table>
    <div class="shop-footer">
        <div class="row">
            <div class="col-2">
                <div class="inshi">
                    電子領収書<br>につき<br>印紙不要
                </div>
            </div>
            <div class="col-7">
                {% if BaseInfo.company_name %}
                    {{ BaseInfo.company_name }}<br>
                {% endif %}
                {{ BaseInfo.shop_name }}<br>
                〒100-0001<br>
                東京都千代田区千代田1-1-1<br>
                千代田ビル 12F<br>
                TEL 03-0000-0000<br>
                MAIL xxxxxxxx@example.com
            </div>
        </div>
    </div>

    <div id="print-footer" class="text-center mt-5">
        <button type="button" id="print">プリントアウトする</button>
        <button onclick="window.close();">閉じる</button>
    </div>
</div>
</body>
</html>
- app/template/default/Mypage/print_invoice.twig (請求書フォーマット)
<!doctype html>
<html lang="ja">
<head>
    <meta charset="UTF-8">
    <link href="https://cdn.jsdelivr.net/npm/bootstrap@5.1.3/dist/css/bootstrap.min.css" rel="stylesheet" integrity="sha384-1BmE4kWBq78iYhFldvKuhfTAU6auU8tT94WrHftjDbrCEXSU1oBoqyl2QvZ6jIW3" crossorigin="anonymous">
    <title>請求書 | {{ BaseInfo.shop_name }}</title>
    <style>
        .container {
            width: 900px !important;
            font-size: 12px;
            margin-top: 20px;
        }

        .logo {
            float: left;
            font-size: 20px;
            font-weight: bold;
        }

        .inkan {
            position: relative;
            padding-right: 80px;
        }

        .inkan-image {
            position: absolute;
            right: 0;
            top: 0;
            z-index: 1;
            width: 70px;
        }

        table thead {
            background-color: #eee !important;
        }

        table tbody {
            border-top: none !important;
        }

    </style>
    <style media="print">
        #print-footer {
            display: none;
        }

        input[type="text"] {
            outline: 0;
            border: none;
        }

        button,
        #edit,
        #mod {
            display: none;
        }
    </style>
    <script src="https://code.jquery.com/jquery-3.6.0.min.js" integrity="sha256-/xUj+3OJU5yExlq6GSYGSHk7tPXikynS7ogEvDej/m4=" crossorigin="anonymous"></script>
    <script src="{{ asset('assets/js/vendor/printThis.js') }}"></script>
    <script>
        $(function() {

            $('#print').click(function() {
                $('body').printThis({
                    importStyle: true
                });
            });

            $('#edit').click(function() {
                var name = $('.print_name').text();
                var input = $('<input type="text" id="input-name">').val(name);
                $('.print_name').empty().append(input);
                $('#edit').hide();
                $('#mod').show();
            });

            $('#mod').click(function() {
                var newname = $('#input-name').val();
                $('.print_name').empty().text(newname);
                $('#input-name').remove();
                $('#edit').show();
                $('#edit').removeAttr('style');
                $('#mod').hide();
                showEx();
            });

            function showEx() {
                var tmp = $('.print_name').text();

                if (tmp == '') {
                    $('.print_name_ex').hide();
                } else {
                    $('.print_name_ex').show();
                }
            }

        })
    </script>
</head>
<body>
<div class="container">
    <div class="logo">
        {{ BaseInfo.shop_name }}
    </div>
    <div class="text-end">No. {{ Order.order_no }}</div>
    <div class="text-end">発行日 {{ Order.Shippings[0].shipping_date|date_format(null, 'Y年m月d日') }}</div>
    <h1 class="text-center">請求書</h1>
    <div class="row">
        <div class="col-6">
            <h2 id="name"><span class="print_name">{% if Order.company_name %}{{ Order.company_name }} 御中{% else %}{{ Order.name01 }} {{ Order.name02 }} </span><span class="print_name_ex"> 様</span>{% endif %}</h2>
            <button type="button" id="edit">名称変更</button>
            <button type="button" id="mod" style="display: none;">適用</button>
            <div>
                このたびはお買上げいただきありがとうございます。<br>
                下記の内容にて請求させていただきます。
            </div>
        </div>
        <div class="col-6">
            <div class="text-end">
                <div class="inkan">
                    {% if BaseInfo.company_name %}
                        {{ BaseInfo.company_name }}<br>
                    {% endif %}
                    {{ BaseInfo.shop_name }}<br>
                    〒100-0001 東京都千代田区千代田1-1-1<br>
                    千代田ビル 12F<br>
                    TEL 03-0000-0000<br>
                    <img src="{{ asset('assets/img/common/inkan.jpg') }}" alt="" class="inkan-image">
                </div>
            </div>
        </div>
    </div>

    <div class="row my-4">
        <div class="text-center">
            <h4 class="d-inline-block border-bottom pb-2">合計金額(税込) <span class="ms-5">{{ Order.payment_total|price }}</span></h4>
        </div>
    </div>

    <div class="row">
        <div class="col-12">
            下記のとおり納品いたします。
        </div>
    </div>

    <table class="table table-bordered">
        <thead>
        <tr>
            <th class="text-end" style="width:4em">項番</th>
            <th>品名</th>
            <th class="text-end" style="width:4em">数量</th>
            <th class="text-end">単価</th>
            <th class="text-end">金額(税込)</th>
        </tr>
        </thead>
        <tbody>

        {% set index = 1 %}
        {% for OrderItem in Order.MergedProductOrderItems %}
            <tr>
                <td class="text-end">{{ index }}</td>
                <td>
                    {{ OrderItem.product_name }}  {{ OrderItem.classcategory_name1 }}  {{ OrderItem.classcategory_name2 }}
                </td>
                <td class="text-end">{{ OrderItem.quantity|number_format }}</td>
                <td class="text-end">{{ OrderItem.price|price }}</td>
                <td class="text-end">{{ OrderItem.total_price|price }}</td>
            </tr>
            {% set index = index + 1 %}
        {% endfor %}
        <tr>
            <td class="text-end">{{ index }}</td>
            <td>送料</td>
            <td class="text-end">1</td>
            <td class="text-end">{{ Order.delivery_fee_total|price }}</td>
            <td class="text-end">{{ Order.delivery_fee_total|price }}</td>
        </tr>
        {% set index = index + 1 %}
        {% if Order.charge > 0 %}
            <tr>
                <td class="text-end">{{ index }}</td>
                <td>手数料</td>
                <td class="text-end">1</td>
                <td class="text-end">{{ Order.charge|price }}</td>
                <td class="text-end">{{ Order.charge|price }}</td>
            </tr>
            {% set index = index + 1 %}
        {% endif %}
        {% for OrderItem in Order.OrderItems %}
            {% if OrderItem.order_item_type_id == 4 %}
                <tr>
                    <td class="text-end">{{ index }}</td>
                    <td>{{ OrderItem.product_name }}</td>
                    <td class="text-end">1</td>
                    <td class="text-end">{{ OrderItem.priceIncTax|price }}</td>
                    <td class="text-end">{{ OrderItem.total_price|price }}</td>
                </tr>
                {% set index = index + 1 %}
            {% endif %}
        {% endfor %}

        <tr>
            <td colspan="3" rowspan="3"></td>
            <td class="text-center">合計</td>
            <td class="text-end h5">{{ Order.payment_total|price }}</td>
        </tr>

        </tbody>
    </table>

    {% if Order.note %}
        <table class="table table-bordered">
            <thead>
            <tr>
                <th>備考</th>
            </tr>
            </thead>
            <tbody>
            <tr>
                <td>{{ Order.note|nl2br }}</td>
            </tr>
            </tbody>
        </table>
    {% endif %}
    <div class="row">
        <div class="col-8">
            【お振込先】<br>
            XXXX銀行 XXXX支店 普通 9999999 XXXX株式会社<br>
            振込手数料は御社ご負担でお願い申し上げます。
        </div>
        <div class="col-4 text-end">
            ご注文商品についてのお問い合わせ・ご意見はこちら<br>
            TEL: {{ BaseInfo.phone_number }}|{{ BaseInfo.business_hour }}
        </div>
    </div>

    <div id="print-footer" class="text-center mt-5">
        <button type="button" id="print">プリントアウトする</button>
        <button onclick="window.close();">閉じる</button>
    </div>
</div>
</body>
</html>
領収書、請求書ともに宛先名も変更できるようにしています。
印刷用ライブラリの導入
画面から簡単に印刷できるようにするため、下記ライブラリを導入します。
こちらのライブラリをダウンロード後、[EC-CUBE ROOT]/html/template/default/assets/js/vendor/printThis.js へ配置してください。
印刷用関数の作成
印刷画面を表示させるためにカスタマイズを行います。
MypageControllerクラスを変更します。変更内容ですが、印刷するための画面を表示させるための関数を追加するだけです。
- src/Eccube/Service/MypageController.php
/**
 * 印刷画面を表示する.
 *
 * @Route("/mypage/{order_no}/{print}/print", name="mypage_print")
 *
 * @param Request $request
 * @param $order_no
 * @param $print
 * @return \Symfony\Component\HttpFoundation\Response
 */
public function exportPrint(Request $request, $order_no, $print)
{
    $Customer = $this->getUser();

    /* @var $Order \Eccube\Entity\Order */
    $Order = $this->orderRepository->findOneBy(
        [
            'order_no' => $order_no,
            'Customer' => $Customer,
        ]
    );

    if (!$Order) {
        throw new NotFoundHttpException();
    }

    return $this->render('Mypage/print_'.$print.'.twig', [
        'Order' => $Order,
    ]);
}
印刷用ボタンを表示
マイページの購入詳細画面で印刷用ボタンを表示させます。既存のファイルに対して修正しても良いのですが、普段修正する場合、app/template/default直下にコピーしてから修正することが多いので、今回もそのようにします。
src/Eccube/Resource/template/default/Mypage/history.twigファイルをapp/template/default/default/Mypage/history.twigへコピー後に以下の内容を追加します。
- app/template/default/default/Mypage/history.twig
<a href="{{ url('mypage_print', {'order_no': Order.order_no, 'print': 'receipt'}) }}" class="ec-inlineBtn" target="_blank">領収書</a>
<a href="{{ url('mypage_print', {'order_no': Order.order_no, 'print': 'invoice'}) }}" class="ec-inlineBtn" target="_blank">請求書</a>
上記内容は表示させたい位置へ追加してください。
以上で表示可能となります。
それぞれ、「発送済み」の時にしか表示させたくないのであれば、以下のように変更してください。
- app/template/default/default/Mypage/history.twig
{% if Order.OrderStatus.id == constant('Eccube\\Entity\\Master\\OrderStatus::DELIVERED') %}
    <a href="{{ url('mypage_print', {'order_no': Order.order_no, 'print': 'receipt'}) }}" class="ec-inlineBtn" target="_blank">領収書</a>
    <a href="{{ url('mypage_print', {'order_no': Order.order_no, 'print': 'invoice'}) }}" class="ec-inlineBtn" target="_blank">請求書</a>
{% endif %}
また、一度領収書ボタンが押されたらAmazonのように「再発行」を表示させたい場合、DBを変更する必要があります。
その方法は今回割愛しますが、必要な方はコメントに欲しいと記述してください。
なお、領収書については税込5万円を超えた場合、収入印紙が必要じゃないのかと聞かれることが多いのですが、
今回の方法は電子書類扱いとなるため非課税扱いとなります。
そのため、領収書ファイルをメール、FAXなどで送った場合などは印紙が不要です。
電子領収書をプリントアウトした場合も、そこに印鑑を押印しない限りは非課税扱いですので収入印紙は不要となります。
以上で領収書と請求書の作成方法となりますので必要な方は参考にしてください。
EC-CUBE3でphp7.3以降に対応させる方法
EC-CUBE Advent Calendar 2021 9日目の記事です。
EC-CUBE3では公開当初php5.3〜7.1までしか対応しておらず、最近のレンタルサーバではphp7.3以上しか利用できないというケースが増えています。
また、レンタルサーバによっては事前アナウンスはありますが、強制的にphp7.4に変更されたりする時もあります。
そこで、php7.3以降でも動作する対応方法をご紹介します。
php7.3以降の対応方法
前提条件として最新のEC-CUBE3系で説明しますが、それ以外をお使いの方でも恐らく動作すると思います。
EC-CUBE3系をお使いの方で何も対応せずにphp7.3にすると、selectタグが正常に動作されない現象が発生します。
- php7.2以下

- php7.3以上
こちらを対応するにはTwigのバージョンを1.41.0以上にする必要があります。
導入方法ですがMac及びLinuxを対象に説明しますが、レンタルサーバ上で対応する場合、SSHでログイン出来る環境を前提にしています。
- composer.pharファイルの取得
EC-CUBEが保存されているディレクトリ まで移動し、以下のコマンドを実行します。
curl -OL https://getcomposer.org/download/1.10.23/composer.phar
- Twigのインストール
twigをインストールします。以下のコマンドを実行します。時間がかかるため気長にお待ちください。
php composer.phar require --ignore-platform-reqs twig/twig "1.41.0"
以上でphp7.3以降でも問題なく動作されるようになります。
もし、SSHが利用できないという方は推奨はしていませんが、下記ファイルを書き換えることでも対応可能です。
- vendor/twig/twig/lib/Twig/Lexer.php
174行目にある、
if (isset($this->positions[2][$this->position][0])) {
    $text = rtrim($text);
}
を
if (isset($this->positions[2][$this->position][0]) && ($this->options['whitespace_trim'] === $this->positions[2][$this->position][0])) {
    $text = rtrim($text);
}
に変更してください。 こちらの方法で対応された方は必ず管理画面のキャッシュ管理よりキャッシュ削除をしてください。
以上でphp7.3以降の対応となりますので、お困りの方は是非お試しください。
EC-CUBE3でGA4とUAの簡易的なeコマースタグ設定方法
EC-CUBE Advent Calendar 2021 8日目の記事です。
EC-CUBEでサイトを公開した後に、eコマースタグを設定したいという要望があります。 その方法を簡単に書いてきます。
GA4はまだ利用されていない方も多いと思いますので、 今回はGA4とUA両方対応できるようにタグを記述していますが、 どちらかしか利用していない場合、不要なコードは削除してください。
前提条件として、タグマネージャー を利用していることとします。 eコマースの詳細な解説は以下の公式サイトもご確認ください。
EC-CUBE4用はこちらをご覧ください。
EC-CUBE4でGA4とUAの簡易的なeコマースタグ設定方法 - AmidaikeBlog
タグマネージャーの設置方法
タグマネージャー用ブロック作成
ブロック管理より、以下のブロックを作成しておきます。
- ヘッダー用タグ作成
ブロック名 : Google Tag Manager head
ファイル名 : googletagmanagerhead
コード :
<!-- Google Tag Manager -->
<script>(function(w,d,s,l,i){w[l]=w[l]||[];w[l].push({'gtm.start':
new Date().getTime(),event:'gtm.js'});var f=d.getElementsByTagName(s)[0],
j=d.createElement(s),dl=l!='dataLayer'?'&l='+l:'';j.async=true;j.src=
'https://www.googletagmanager.com/gtm.js?id='+i+dl;f.parentNode.insertBefore(j,f);
})(window,document,'script','dataLayer','GTM-XXXXXXXX');</script>
<!-- End Google Tag Manager -->
- bodyタグ直下用タグ作成
ブロック名 : Google Tag Manager body
ファイル名 : googletagmanagerbody
コード :
<!-- Google Tag Manager (noscript) -->
<noscript><iframe src="https://www.googletagmanager.com/ns.html?id=GTM-XXXXXXXX"
height="0" width="0" style="display:none;visibility:hidden"></iframe></noscript>
<!-- End Google Tag Manager (noscript) -->
XXXXXXXXの箇所はそれぞれのIDに置き換えてください。
ページ管理に設定
作成したそれぞれのブロックをページ管理のTOPページのレイアウト編集で配置します。
配置場所はそれぞれ、以下の場所へ配置します。
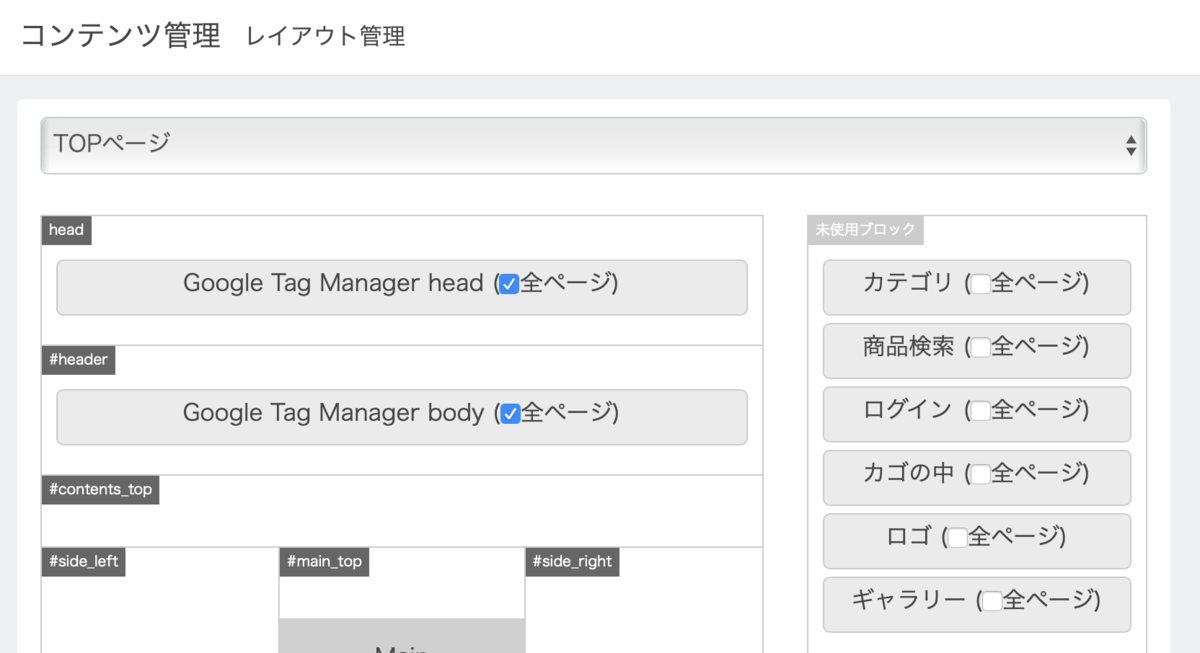
全ページにチェックを入れるのを忘れないでください。
eコマースタグ用ブロックの作成
再度ブロック管理より以下のブロックを作成してください。
- eコマースタグ用ブロック作成
ブロック名 : Google Ecommerce Tag
ファイル名 : ecommerce
コード :
{% if app.request.get('_route') == 'product_list' %}
    {# 商品一覧 #}
    <script>
        dataLayer.push({ecommerce: null});
        // GA4
        dataLayer.push({
            'event': 'view_item_list',
            'ecommerce': {
                'items': [
                    {% for Product in pagination %}
                    {
                        'item_name': '{{ Product.name }}',
                        'item_id': '{{ Product.getCodeMin ? Product.getCodeMin : Product.id }}',
                        'price': '{{ Product.getPrice02IncTaxMin }}',
                    }{% if not loop.last %},{% endif %}
                    {% endfor %}
                ]
            }
        });

        // UA
        dataLayer.push({
            'ecommerce': {
                'currencyCode': 'JPY',
                'impressions': [
                    {% for Product in pagination %}
                    {
                        'name': '{{ Product.name }}',
                        'id': '{{ Product.getCodeMin ? Product.getCodeMin : Product.id }}',
                        'price': '{{ Product.getPrice02IncTaxMin }}',
                    }{% if not loop.last %},{% endif %}
                    {% endfor %}
                ]
            }
        });
    </script>

{% elseif app.request.get('_route') == 'product_detail' %}
    {# 商品詳細 #}
    <script>
        dataLayer.push({ecommerce: null});
        // GA4
        dataLayer.push({
            'event': 'view_item',
            'ecommerce': {
                'items': [{
                    'item_name': '{{ Product.name }}',
                    'item_id': '{{ Product.getCodeMin ? Product.getCodeMin : Product.id }}',
                    'price': '{{ Product.getPrice02IncTaxMin }}',
                    'item_category': '{% for ProductCategory in Product.ProductCategories %}{% for Category in ProductCategory.Category.path %}{% if ( Category.parent is not null ) %}{{ Category.Parent.name }}:{{ Category.name }}{% endif %}{% endfor %}{% endfor %}',
                    'quantity': '1'
                }]
            }
        });

        // UA
        dataLayer.push({
            'ecommerce': {
                'detail': {
                    'products': [{
                        'name': '{{ Product.name }}',
                        'id': '{{ Product.getCodeMin ? Product.getCodeMin : Product.id }}',
                        'price': '{{ Product.getPrice02IncTaxMin }}',
                        'category': '{% for ProductCategory in Product.ProductCategories %}{% for Category in ProductCategory.Category.path %}{% if ( Category.parent is not null ) %}{{ Category.Parent.name }}:{{ Category.name }}{% endif %}{% endfor %}{% endfor %}',
                    }]
                }
            }
        });
    </script>

{% elseif app.request.get('_route') == 'cart' %}
    {# カートに追加 #}
    <script>
        dataLayer.push({ecommerce: null});
        // GA4
        dataLayer.push({
            'event': 'add_to_cart',
            'ecommerce': {
                'items': [
                    {% for CartItem in Cart.CartItems %}
                    {% set ProductClass = CartItem.Object %}
                    {% set Product = ProductClass.Product %}
                    {
                        'item_name': '{{ Product.name }}',
                        'item_id': '{{ Product.getCodeMin ? Product.getCodeMin : Product.id }}',
                        'price': '{{ Product.getPrice02IncTaxMin }}'
                    }{% if not loop.last %},{% endif %}
                    {% endfor %}
                ]
            }
        });

        // UA
        dataLayer.push({
            'event': 'addToCart',
            'ecommerce': {
                'currencyCode': 'JPY',
                'add': {
                    'products': [
                        {% for CartItem in Cart.CartItems %}
                        {% set ProductClass = CartItem.Object %}
                        {% set Product = ProductClass.Product %}
                        {
                            'name': '{{ Product.name }}',
                            'id': '{{ Product.getCodeMin ? Product.getCodeMin : Product.id }}',
                            'price': '{{ Product.getPrice02IncTaxMin }}',
                            'quantity': {{ CartItem.quantity }}
                        }{% if not loop.last %},{% endif %}
                        {% endfor %}
                    ]
                }
            }
        });
    </script>

{% elseif app.request.get('_route') == 'shopping_complete' %}
    {# 購入完了 #}

    {% if Order.id %}
        <script>
            dataLayer.push({ecommerce: null});
            // GA4
            dataLayer.push({
                'event': 'purchase',
                'ecommerce': {
                    'transaction_id': '{{ Order.id }}',
                    'affiliation': '{{ BaseInfo.shop_name }}',
                    'value': '{{ Order.subtotal }}',
                    'tax': '{{ Order.tax }}',
                    'shipping': '{{ Order.delivery_fee_total }}',
                    'currency': 'JPY',
                    'items': [
                        {% for OrderDetail in Order.OrderDetails %}
                        {
                            'item_name': '{{ OrderDetail.product_name }}',
                            'item_id': '{{ OrderDetail.product_code ? OrderDetail.product_code : OrderDetail.product.id }}',
                            'price': '{{ OrderDetail.price_inc_tax }}',
                            'item_category': '{% for ProductCategory in OrderDetail.Product.ProductCategories %}{% for Category in ProductCategory.Category.path %}{% if ( Category.parent is not null ) %}{{ Category.Parent.name }}:{{ Category.name }}{% endif %}{% endfor %}{% endfor %}',
                            'quantity': {{ OrderDetail.quantity }}
                        }{% if not loop.last %},{% endif %}
                        {% endfor %}
                    ]
                }
            });

            // UA
            dataLayer.push({
                'ecommerce': {
                    'purchase': {
                        'actionField': {
                            'id': '{{ Order.id }}',
                            'affiliation': '{{ BaseInfo.shop_name }}',
                            'revenue': '{{ Order.subtotal }}',
                            'tax': '{{ Order.tax }}',
                            'shipping': '{{ Order.delivery_fee_total }}'
                        },
                        'products': [
                            {% for OrderDetail in Order.OrderDetails %}
                            {
                                'name': '{{ OrderDetail.product_name }}',
                                'id': '{{ OrderDetail.product_code ? OrderDetail.product_code : OrderDetail.product.id }}',
                                'price': '{{ OrderDetail.price_inc_tax }}',
                                'category': '{% for ProductCategory in OrderDetail.Product.ProductCategories %}{% for Category in ProductCategory.Category.path %}{% if ( Category.parent is not null ) %}{{ Category.Parent.name }}:{{ Category.name }}{% endif %}{% endfor %}{% endfor %}',
                                'quantity': {{ OrderDetail.quantity }}
                            }{% if not loop.last %},{% endif %}
                            {% endfor %}
                        ]
                    }
                }
            });
        </script>
    {% endif %}

{% endif %}
こちらの内容ですが、route名で判断して必要なeコマースタグ用のコードを設定しています。 また、項目についても必要最低限の記述しかしていないため、適宜追加してみてください。
ページ管理に設定
作成したそれぞれのブロックを再度ページ管理のTOPページのレイアウト編集で配置します。
配置場所は以下の場所へ配置します。

今回は基本的なアクションしか設定していませんが、「ショッピング カートから商品を削除する」などのアクションについても似たような方法で記述すれば対応可能です。
なお、GA4の場合、タグマネージャーの設定が複雑なためこちらは時間がある時にまたまとめます。
以上でeコマースタグの設置方法となりますので参考にしてください。
EC-CUBE4でGA4とUAの簡易的なeコマースタグ設定方法
EC-CUBE Advent Calendar 2021 4日目の記事です。
EC-CUBEでサイトを公開した後に、eコマースタグを設定したいという要望があります。 その方法を簡単に書いてきます。
GA4はまだ利用されていない方も多いと思いますので、 今回はGA4とUA両方対応できるようにタグを記述していますが、 どちらかしか利用していない場合、不要なコードは削除してください。
前提条件として、タグマネージャー を利用していることとします。 eコマースの詳細な解説は以下の公式サイトもご確認ください。
タグマネージャーの設置方法
タグマネージャー用ブロック作成
ブロック管理より、以下のブロックを作成しておきます。
- ヘッダー用タグ作成
ブロック名 : Google Tag Manager head
ファイル名 : googletagmanagerhead
コード :
<!-- Google Tag Manager -->
<script>(function(w,d,s,l,i){w[l]=w[l]||[];w[l].push({'gtm.start':
new Date().getTime(),event:'gtm.js'});var f=d.getElementsByTagName(s)[0],
j=d.createElement(s),dl=l!='dataLayer'?'&l='+l:'';j.async=true;j.src=
'https://www.googletagmanager.com/gtm.js?id='+i+dl;f.parentNode.insertBefore(j,f);
})(window,document,'script','dataLayer','GTM-XXXXXXXX');</script>
<!-- End Google Tag Manager -->
- bodyタグ直下用タグ作成
ブロック名 : Google Tag Manager body
ファイル名 : googletagmanagerbody
コード :
<!-- Google Tag Manager (noscript) -->
<noscript><iframe src="https://www.googletagmanager.com/ns.html?id=GTM-XXXXXXXX"
height="0" width="0" style="display:none;visibility:hidden"></iframe></noscript>
<!-- End Google Tag Manager (noscript) -->
XXXXXXXXの箇所はそれぞれのIDに置き換えてください。
レイアウト管理に設定
作成したそれぞれのブロックをトップページ用レイアウトと下層ページ用レイアウトに配置します。
配置場所はそれぞれ、以下の場所へ配置します。
トップページ用レイアウト

下層ページ用レイアウト

eコマースタグ用ブロックの作成
再度ブロック管理より以下のブロックを作成してください。
- eコマースタグ用ブロック作成
ブロック名 : Google Ecommerce Tag
ファイル名 : ecommerce
コード :
{% if app.request.get('_route') == 'product_list' %}
    {# 商品一覧 #}
    <script>
        dataLayer.push({ecommerce: null});
        // GA4
        dataLayer.push({
            'event': 'view_item_list',
            'ecommerce': {
                'items': [
                    {% for Product in pagination %}
                    {
                        'item_name': '{{ Product.name }}',
                        'item_id': '{{ Product.getCodeMin ? Product.getCodeMin : Product.id }}',
                        'price': '{{ Product.getPrice02IncTaxMin }}',
                        'item_category': '{% for ProductCategory in Product.ProductCategories %}{% for Category in ProductCategory.Category.path %}{% if ( Category.parent is not null ) %}{{ Category.Parent.name }}:{{ Category.name }}{% endif %}{% endfor %}{% endfor %}',
                    }{% if not loop.last %},{% endif %}
                    {% endfor %}
                ]
            }
        });

        // UA
        dataLayer.push({
            'ecommerce': {
                'currencyCode': 'JPY',
                'impressions': [
                    {% for Product in pagination %}
                    {
                        'name': '{{ Product.name }}',
                        'id': '{{ Product.getCodeMin ? Product.getCodeMin : Product.id }}',
                        'price': '{{ Product.getPrice02IncTaxMin }}',
                        'category': '{% for ProductCategory in Product.ProductCategories %}{% for Category in ProductCategory.Category.path %}{% if ( Category.parent is not null ) %}{{ Category.Parent.name }}:{{ Category.name }}{% endif %}{% endfor %}{% endfor %}',
                    }{% if not loop.last %},{% endif %}
                    {% endfor %}
                ]
            }
        });

    </script>

{% elseif app.request.get('_route') == 'product_detail' %}
    {# 商品詳細 #}
    <script>
        // Measure a view of product details. This example assumes the detail view occurs on pageload,
        dataLayer.push({ecommerce: null});  // Clear the previous ecommerce object.
        // GA4
        dataLayer.push({
            'event': 'view_item',
            'ecommerce': {
                'items': [{
                    'item_name': '{{ Product.name }}',
                    'item_id': '{{ Product.getCodeMin ? Product.getCodeMin : Product.id }}',
                    'price': '{{ Product.getPrice02IncTaxMin }}',
                    'item_category': '{% for ProductCategory in Product.ProductCategories %}{% for Category in ProductCategory.Category.path %}{% if ( Category.parent is not null ) %}{{ Category.Parent.name }}:{{ Category.name }}{% endif %}{% endfor %}{% endfor %}',
                    'quantity': '1'
                }]
            }
        });

        // UA
        dataLayer.push({
            'ecommerce': {
                'detail': {
                    'products': [{
                        'name': '{{ Product.name }}',         // Name or ID is required.
                        'id': '{{ Product.getCodeMin ? Product.getCodeMin : Product.id }}',
                        'price': '{{ Product.getPrice02IncTaxMin }}',
                        'category': '{% for ProductCategory in Product.ProductCategories %}{% for Category in ProductCategory.Category.path %}{% if ( Category.parent is not null ) %}{{ Category.Parent.name }}:{{ Category.name }}{% endif %}{% endfor %}{% endfor %}',
                    }]
                }
            }
        });
    </script>

{% elseif app.request.get('_route') == 'cart' %}
    {# カートに追加 #}
    <script>
        // Measure when a product is added to a shopping cart
        dataLayer.push({ecommerce: null});  // Clear the previous ecommerce object.
        // GA4
        dataLayer.push({
            'event': 'add_to_cart',
            'ecommerce': {
                'items': [
                    {% for CartIndex,Cart in Carts %}
                    {% for CartItem in Cart.CartItems %}
                    {% set ProductClass = CartItem.ProductClass %}
                    {% set Product = ProductClass.Product %}
                    {
                        'item_name': '{{ Product.name }}',
                        'item_id': '{{ Product.getCodeMin ? Product.getCodeMin : Product.id }}',
                        'price': '{{ Product.getPrice02IncTaxMin }}'
                    }{% if not loop.last %},{% endif %}
                    {% endfor %}
                    {% endfor %}
                ]
            }
        });

        // UA
        dataLayer.push({
            'event': 'addToCart',
            'ecommerce': {
                'currencyCode': 'JPY',
                'add': {
                    'products': [
                        {% for CartIndex,Cart in Carts %}
                        {% for CartItem in Cart.CartItems %}
                        {% set ProductClass = CartItem.ProductClass %}
                        {% set Product = ProductClass.Product %}
                        {
                            'name': '{{ Product.name }}',
                            'id': '{{ Product.getCodeMin ? Product.getCodeMin : Product.id }}',
                            'price': '{{ Product.getPrice02IncTaxMin }}',
                            'quantity': {{ CartItem.quantity }}
                        }{% if not loop.last %},{% endif %}
                        {% endfor %}
                        {% endfor %}
                    ]
                }
            }
        });

    </script>

{% elseif app.request.get('_route') == 'shopping_complete' %}
    {# 購入完了 #}

    {% if Order.id %}
        <script>
            dataLayer.push({ecommerce: null});
            // GA4
            dataLayer.push({
                'event': 'purchase',
                'ecommerce': {
                    'transaction_id': '{{ Order.order_no }}',
                    'affiliation': '{{ BaseInfo.shop_name }}',
                    'value': '{{ Order.subtotal }}',
                    'tax': '{{ Order.tax }}',
                    'shipping': '{{ Order.delivery_fee_total }}',
                    'currency': 'JPY',
                    'items': [
                        {% for OrderItem in Order.MergedProductOrderItems %}
                        {
                            'item_name': '{{ OrderItem.product_name }}',
                            'item_id': '{{ OrderItem.product_code ? OrderItem.product_code : OrderItem.product.id }}',
                            'price': '{{ OrderItem.price_inc_tax }}',
                            'item_category': '{% for ProductCategory in OrderItem.Product.ProductCategories %}{% for Category in ProductCategory.Category.path %}{% if ( Category.parent is not null ) %}{{ Category.Parent.name }}:{{ Category.name }}{% endif %}{% endfor %}{% endfor %}',
                            'quantity': {{ OrderItem.quantity }}
                        }{% if not loop.last %},{% endif %}
                        {% endfor %}
                    ]
                }
            });

            // UA
            dataLayer.push({
                'ecommerce': {
                    'purchase': {
                        'actionField': {
                            'id': '{{ Order.order_no }}',
                            'affiliation': '{{ BaseInfo.shop_name }}',
                            'revenue': '{{ Order.subtotal }}',
                            'tax': '{{ Order.tax }}',
                            'shipping': '{{ Order.delivery_fee_total }}'
                        },
                        'products': [
                            {% for OrderItem in Order.MergedProductOrderItems %}
                            {
                                'name': '{{ OrderItem.product_name }}',
                                'id': '{{ OrderItem.product_code ? OrderItem.product_code : OrderItem.product.id }}',
                                'price': '{{ OrderItem.price_inc_tax }}',
                                'category': '{% for ProductCategory in OrderItem.Product.ProductCategories %}{% for Category in ProductCategory.Category.path %}{% if ( Category.parent is not null ) %}{{ Category.Parent.name }}:{{ Category.name }}{% endif %}{% endfor %}{% endfor %}',
                                'quantity': {{ OrderItem.quantity }}
                            }{% if not loop.last %},{% endif %}
                            {% endfor %}
                        ]
                    }
                }
            });
        </script>
    {% endif %}

{% endif %}
こちらの内容ですが、route名で判断して必要なeコマースタグ用のコードを設定しています。 また、項目についても必要最低限の記述しかしていないため、適宜追加してみてください。
レイアウト管理に設定
作成したそれぞれのブロックをトップページ用レイアウトと下層ページ用レイアウトに配置します。
配置場所はそれぞれ、以下の場所へ配置します。
トップページ用レイアウト

下層ページ用レイアウト

今回は基本的なアクションしか設定していませんが、「ショッピング カートから商品を削除する」などのアクションについても似たような方法で記述すれば対応可能です。
なお、GA4の場合、タグマネージャーの設定が複雑なためこちらは時間がある時にまたまとめます。
以上でeコマースタグの設置方法となりますので参考にしてください。
EC-CUBE4でDBへの時間をUTCで保存させないようにする方法
EC-CUBE4から国際化対応が行われており、DBの時間の持たせ方もUTCに対応されています。
データ型の変更 by chihiro-adachi · Pull Request #2185 · EC-CUBE/ec-cube · GitHub
海外なども見据えたサイトであればこのままで問題ありませんが、日本国内のみを対象としており、別システム連携があって直接DBを参照する場合、UTCだと何かと不便な時があるため、UTCで保存させない方法を説明します。
修正方法は非常に簡単で、
- app/config/eccube/packages/doctrine.yaml
        types:
             datetime: 'Eccube\Doctrine\DBAL\Types\UTCDateTimeType'
             datetimetz: 'Eccube\Doctrine\DBAL\Types\UTCDateTimeTzType'
と表記されている箇所を、
#        types:
#            datetime: 'Eccube\Doctrine\DBAL\Types\UTCDateTimeType'
#            datetimetz: 'Eccube\Doctrine\DBAL\Types\UTCDateTimeTzType'
とコメントアウトするだけです。
これを行うことでDBに保存される時間はUTCでは無くなります。
既に本番運用されている方でも、この修正を加えてもDBの時刻がUTCで保存されなくなるだけなので、状況に応じて変更してください。
EC-CUBE4でトップページ等以外はログインを必須にする簡易的な会員制サイトを作る方法
EC-CUBE Advent Calendar 2020 22日目の記事です。
お客さんの要望で会員制のクローズドサイトを作成したいという要望が時々あります。
クローズドサイトといっても完全にクローズドにするのか、トップページと会員登録だけ公開しておくのか、専用IDを別途発行して対応するのかなど色々とあります。
今回は、トップページと会員登録だけを公開した会員制サイトのカスタマイズを紹介します。
ログインが必要となる処理の設定
ログインを必須とするのは、EccubeExtensionクラスに定義を追加するだけで対応可能です。EccubeExtensionクラスは同名のものがあるのでパスを確認するようにしてください。
- src/Eccube/DependencyInjection/EccubeExtension.php
// SSL強制時は, httpsのみにアクセス制限する
$accessControl = [
  ['path' => '^/%eccube_admin_route%/login', 'roles' => 'IS_AUTHENTICATED_ANONYMOUSLY'],
  ['path' => '^/%eccube_admin_route%/', 'roles' => 'ROLE_ADMIN'],
  ['path' => '^/mypage/login', 'roles' => 'IS_AUTHENTICATED_ANONYMOUSLY'],
  ['path' => '^/mypage/withdraw_complete', 'roles' => 'IS_AUTHENTICATED_ANONYMOUSLY'],
  ['path' => '^/mypage/change', 'roles' => 'IS_AUTHENTICATED_FULLY'],
  ['path' => '^/mypage/', 'roles' => 'ROLE_USER'],
];
ここの定義にログイン必須にするための処理を追加します。
// SSL強制時は, httpsのみにアクセス制限する
$accessControl = [
  ['path' => '^/%eccube_admin_route%/login', 'roles' => 'IS_AUTHENTICATED_ANONYMOUSLY'],
  ['path' => '^/%eccube_admin_route%/', 'roles' => 'ROLE_ADMIN'],
  ['path' => '^/mypage/login', 'roles' => 'IS_AUTHENTICATED_ANONYMOUSLY'],
  ['path' => '^/mypage/withdraw_complete', 'roles' => 'IS_AUTHENTICATED_ANONYMOUSLY'],
  ['path' => '^/mypage/change', 'roles' => 'IS_AUTHENTICATED_FULLY'],
  ['path' => '^/mypage/', 'roles' => 'ROLE_USER'],
  // 定義追加
  ['path' => '^/$', 'roles' => 'IS_AUTHENTICATED_ANONYMOUSLY'], // トップページはログイン不要
  ['path' => '^/entry', 'roles' => 'IS_AUTHENTICATED_ANONYMOUSLY'], // 会員登録ページはログイン不要
  ['path' => '^/', 'roles' => 'ROLE_USER'], // 全ページログイン必須
];
この処理を追加後、トップページと会員登録ページ以外にアクセスしてログイン画面が表示されれば設定完了です。
特定商取引やプライバシーポリシーなども除外する場合、上記に定義を追加するだけです。
パスの部分はURLを設定する様にしてください。
権限について
EC-CUBEではログインを行うのに権限が存在しており、
- IS_AUTHENTICATED_ANONYMOUSLY : ログインなしでのアクセス可
- IS_AUTHENTICATED_FULLY : 会員ログインが必要
- ROLE_USER : 会員ログインが必要
- ROLE_ADMIN : 管理者ログインが必要
というようになっています。先ほど設定したIS_AUTHENTICATED_ANONYMOUSLYなどは権限のことを表しています。
ROLE_USERとIS_AUTHENTICATED_FULLYの違いですが、ログイン時に自動ログイン(REMEMBERME)にチェックをいれてログインしている時に動作が異なります。
- ROLE_USER : 自動ログイン済の場合はログイン不要
- IS_AUTHENTICATED_FULLY : 自動ログインされていてもログインが必要
という動作になります。EC-CUBEでは会員情報変更時のこの権限を利用しています。
以上で簡単に会員サイトを作る仕組みを用意しましたが、このままであれば会員登録されると誰でも見れるサイトになってしまいますので、会員登録された場合、管理画面側で本登録をさせるというカスタマイズを行えばよりクローズドなサイトが出来上がります。
その方法は後日説明します。